

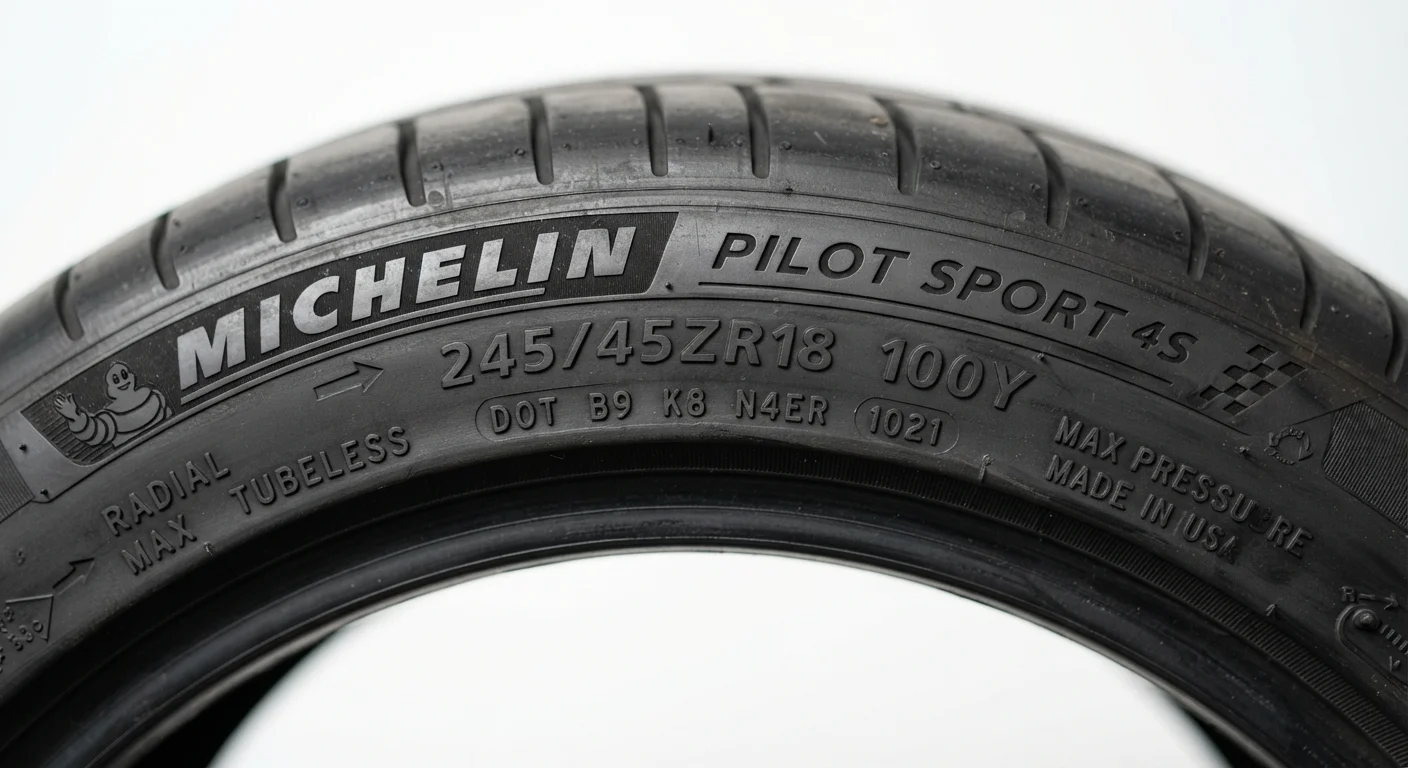
What That String of Characters Actually Means
Look at the sidewall of any passenger tyre and you'll find a code that looks something like 225/55R17 97W. It isn't marketing copy — it's a standardised specification that encodes five distinct measurements, each one relevant to how safely and correctly that tyre fits your vehicle.
| Width measurement unit | Millimetres (mm) |
| Aspect ratio represents | Sidewall height as % of section width |
| Most common construction type | Radial (R) |
| Rim diameter unit | Inches |
| Load index 97 equals | 730 kg maximum load per tyre (ETRTO Standards Manual) |
| Speed rating W equals | 270 km/h (168 mph) maximum (ETRTO / TRA standardised rating tables) |
| Recommended max tyre age | 6–10 years from DOT date code (Major tyre manufacturers' guidance) |
Understanding the code matters because substituting an incorrect tyre size — even one that physically mounts — can affect load capacity, speedometer accuracy, and handling dynamics. The markings are your primary reference whenever you're verifying a fitment or cross-checking a replacement.
Breaking Down Each Element
Section Width
The first number — 225 in our example — is the tyre's section width in millimetres, measured from sidewall to sidewall when mounted on its specified rim width and inflated to the correct pressure. A wider tyre generally provides a larger contact patch but also increases rolling resistance and road noise.
Aspect Ratio
The two-digit number after the slash — 55 — is the aspect ratio, expressed as a percentage. It represents the tyre's sidewall height as a proportion of its section width. A 55-series tyre has a sidewall height equal to 55% of 225 mm, which works out to about 124 mm. Lower aspect ratios (40, 45) mean shorter, stiffer sidewalls; higher ratios (65, 70) indicate taller sidewalls that typically absorb road irregularities more readily.
Construction Type
The letter R stands for radial, meaning the internal ply cords run perpendicular to the direction of travel. Radial construction is the near-universal standard for modern passenger and light-truck tyres. An older D (diagonal bias) or B (belted bias) designation appears only on certain specialist or vintage applications.
Rim Diameter
The number following the construction letter — 17 — is the wheel diameter in inches that the tyre is designed to fit. Mixing tyre and wheel diameters is not possible without specialist equipment, so this figure is the clearest constraint in any fitment decision.
Load Index and Speed Rating
The final pair — 97W — is where safety compliance becomes critical. The number is the load index: a coded figure that maps to a maximum load capacity in kilograms. An index of 97 corresponds to 730 kg per tyre. Always fit a load index equal to or greater than the vehicle manufacturer's minimum specification; fitting a lower-rated tyre is a safety risk and may invalidate insurance coverage.
The letter is the speed rating, denoting the maximum sustained speed the tyre is designed to handle. W indicates 270 km/h (168 mph). Common ratings you'll encounter include S (180 km/h), H (210 km/h), V (240 km/h), and W or Y for higher-performance applications. Again, never fit a tyre with a lower speed rating than your vehicle's specification. See our guide to what speed ratings and limits represent for broader context on how these figures relate to real-world driving.
Section Width
The tyre's widest measurement in millimetres from sidewall to sidewall, measured when mounted on the specified rim and inflated to the correct pressure. It is the first number in a standard tyre code.
Aspect Ratio
The sidewall height expressed as a percentage of the tyre's section width. A lower aspect ratio means a shorter, stiffer sidewall; a higher ratio means a taller, more flexible one.
Load Index
A coded number that represents the maximum weight a single tyre can support when properly inflated. Each index number corresponds to a specific kilogram rating in a standardised table.
Speed Rating
A letter code indicating the maximum sustained speed for which the tyre is certified. It reflects tyre construction and heat resistance at speed, not a recommended driving speed.
Three-Peak Mountain Snowflake (3PMSF)
A certification symbol indicating the tyre has passed standardised snow-traction testing. It is a more rigorous winter designation than the basic M+S marking.
DOT Date Code
A four-digit stamp at the end of the DOT compliance string showing the week and year the tyre was manufactured. Used to assess tyre age independent of tread wear.
Additional Markings Worth Knowing
Beyond the primary size code, sidewalls carry several supplementary markings that communicate important information:
- M+S or M&S — Mud and Snow designation. Indicates the tread pattern meets a minimum traction threshold in light winter conditions, though it is not the same as a dedicated winter tyre.
- Three-Peak Mountain Snowflake (3PMSF) — A more rigorous winter certification. Tyres carrying this symbol have passed standardised snow-traction testing and are accepted as winter tyres in jurisdictions that legally require them.
- XL or Extra Load — The tyre is reinforced to carry higher loads than a standard tyre of the same size. XL tyres are often fitted to heavier vehicles and require higher inflation pressures than standard-load equivalents.
- Run-flat indicators — Markings such as ROF, SSR, or RFT identify run-flat tyres, which are constructed to support a vehicle's weight for a limited distance after pressure loss.
- DOT code — A Department of Transportation compliance code ending in a four-digit date stamp (week and year of manufacture). This is essential for determining tyre age; most manufacturers recommend replacing tyres older than six to ten years regardless of visible tread depth.
For a complementary look at the two numbers that most directly influence daily tyre safety, see our guide to tyre pressure and tread depth.
Using the Sidewall Code Practically
Your vehicle's door jamb placard or owner's manual lists the OEM-specified tyre size, load index, and speed rating. When replacing tyres, match all three values as a minimum. Deviating from the manufacturer's size — such as fitting a different aspect ratio to alter ride height — should only be done after confirming that the overall rolling diameter remains within an acceptable tolerance (typically within 3% of the original) to avoid speedometer error and potential interference with driver-assistance systems.
If you notice uneven wear patterns or persistent vibration, the sidewall code alone won't diagnose the cause — that's a job for a qualified tyre technician. Tyre fitment decisions involving non-standard sizes or load-bearing modifications should always involve a professional assessment. For context on how alignment and balancing affect tyre condition over time, see our explainer on wheel alignment and tyre balancing.
The content on this site is for informational purposes only and is not a substitute for professional advice. Always consult a qualified professional for guidance specific to your situation.